Simulating Film From Digital Video
It is often desirable to reproduce the attractive visual effects of film when using digital video. To do this, the motion signature of film must be recreated, and the color and lighting effects of film must be simulated. This guide concentrates on the faking the color, lighting and texture of film. Motion signature emulation is covered in detail in this excellent guide from DVInfo.
Here I have used Photoshop on a single still image. Although in theory this could be defined as an action and used to batch process video, this would be extremely slow and impractical. I am currently working on implementing these manipulations as an AVISynth filter. But for the moment, here's how to fix up a still captured from a video camera.
Update
There's been some awesome work over at the Doom9 Forums on making this work with live video stream with AviSynth; have a look at the thread on Doom9 for more details.
Caveats
This kind of effect is only usable when the incoming video is of reasonable quality. The image must have good dynamic range, neither dark and lacking contrast or with blown out highlights and crushed shadows. This is a particular problem when shooting outdoors; DV cameras cannot capture anything like the same range of light as film and once the detail is lost it cannot be regained. Shots taken in carefully lit artificial conditions will give the best results. The Golden Rule is: if you want results that look like film, you need to shoot it as if it were film; light it properly and take steady, smooth shots. The lighting is absolutely critical for film-like results. It is also important to note that film is often shot with very much narrower depth-of-field than is standard in most video cameras; take care to use appropriate DOF's when shooting video.
In the below I have deliberately used strong color casts. You obviously don't need to color the images quite so strongly if you wish, but I feel it adds to the film effect. The addition of grain significantly improves the look of the image and can compensate for the bluriness of the original DV image by masking the blur and making the image look "sharp". Using high levels of grain can mask heavily blurred video, and will give the effect of low-quality/fast film (as opposed to low-quality video!). However, if you're going to be encoding the frames into a highly compressed video later, skip the grain and sharpening steps; this will only reduce the compression quality and will not be visible in the final product. Also, if your input is already pretty sharp or is noisy (e.g. images from a cheap webcam), go easy on the sharpening to avoid nasty artifacts. Apologies for the horrible subject in the tutorial :) It's the only capture I had handy...
Some of the steps used are fairly subtle, but all really do have an effect. They are particularly noticeable in the full resolution images. You can't, for example, really see the effect of the grain layer on the low-resolution images. Applying each of these effects as individual layers helps avoid cumulative distortion of the pixel values, which can be big problem if you've only got 8-bit color channels. These steps are written so that each new layer will lie upon the layer from the previous step (see the final layer layout at the bottom if this is confusing!). I've given the specific values I used at each step of this process, and obviously these might vary a bit if your input is different, so adjust as you feel necessary.
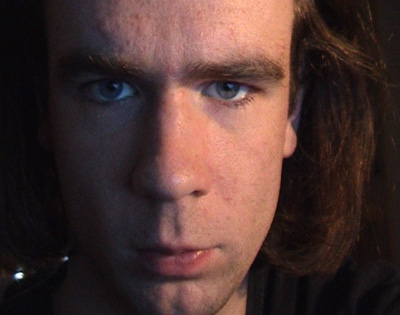
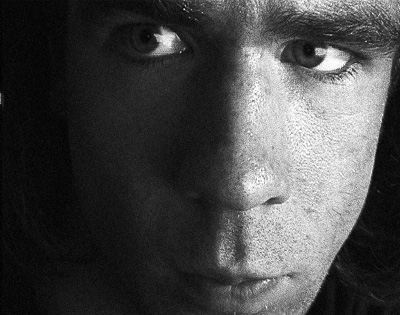
OriginalTake your DV image. We'll use this hideous one of me. Note that it's evenly exposed with very little pure white or pure black, but still with a wide dynamic range. I'll call this Base layer. |
 | |
| | ||
FILM LayerWe want to simulate the light response of film, which has a more contrasty look. Here, this is simulated with sigmoid-shaped response curve, which emphasizes the mid-tones and pushes the brighter and darker tones towards the limits. The (exaggerated) color response of the film is also simulated.Fiddle around with the curves if you want. These have a strong yellow cast, which may be too much if your source is already corrected for artificial light, so adjust accordingly. Duplicate base layer. Apply film curves with Image/Adjustments/Curves. Use these curves . You'll need to select ".AMP" from the drop down menu when loading. |  | |
| | ||
Sharpen and GrainThe DV image is very blurry, so sharpening and adding a little noise are used to increase the apparent sharpness. The sharpening is applied only to the lumininance channel to avoid unpleasant color artifacts. The color channels often have lots of noise and artifacts already, and so blurring these improves the apparent image quality.Image/Mode/Lab color to convert to Lab color. Do not flatten layers. Select Luminance channel from the Channels palette Filters/Sharpen/Unsharp Mask 200% Radius 1.1 Threshold 0 Select 'a' Channel Filters/Blur/Gaussian Blur Radius 1.8 pixels Select 'b' Channel Filters/Blur/Gaussian Blur Radius 1.8 pixels Image/Mode/RGB convert back. Again, do not flatten! Filter/Noise/Add Noise Gaussian ~3% Monochrome [optional: do this right at the end, for a less noisy effect] | 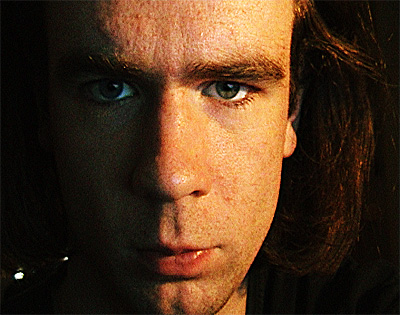 | |
| | ||
Contrast Layer 1This is a bit oversaturated, so we blend in a desaturated but high contrast version.Duplicate FILM layer Check which channel has most detail (blue in my example) Make grayscale via Image/Adjust/Channel Mixer with appropriate mixture for best contrast (70% blue, 10% green, 20% red here) Layer blend to Normal, Opacity ~20% |  | |
| | ||
Highlight LayerNow we gently soften the highlights, giving a brighter glowing effect.Duplicate FILM Layer Filter/Blur/Gaussian Blur Radius 5 pixels Layer blend Screen, Opacity 52% |  | |
| | ||
Detail LayerThe previous step removed some of the fine detail, so we need to restore this. Here I blend in a high pass filtered (fine details only) version of the FILM layer to restore the detail.Duplicate FILM layer Filters/Other/Highpass Radius 6 pixels Image/Adjust/Desaturate Layer blend Soft Light, opacity 30% | 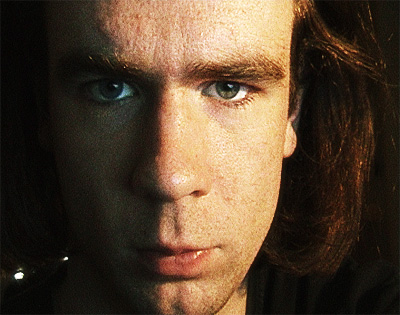 | |
| | ||
Color CastNow we add a color cast to the image. This is fairly extreme here, but it helps balance the image when the original is blended in (next step). The color used depends on what effect you want and how the original image was lit.New Layer Fill with color cast choice; medium dark green or orange are good Layer blend Soft Light, Opacity 40%. Use lower opacity for less dramatic effect | 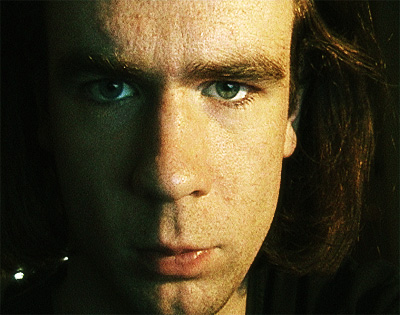 | |
| | ||
Original BlendThe previous steps give an attractive but overdone effect. Blending in a small quantity of the original unmodified image makes the effect much more realistic.Duplicate the base (unmodified) layer. Layer blend normal, opacity 30%. Adjust this opacity to get a balance between contrast and smoothness. | 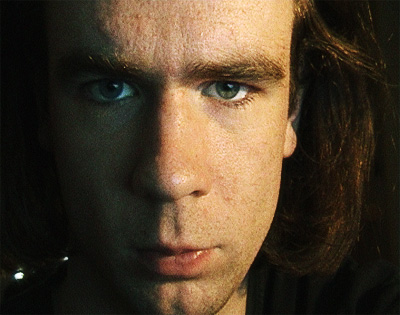 | |
| | ||
Shadow Pull-upThe increase in contrast may have crushed some of the shadows, so by subtly blending in a version of the original image with the shadows brightened slightly we can restore detail to the darker areas. This needs to be done in Lab mode to avoid squashing the colors.Image/Mode/Lab color to convert to Lab color. Do not flatten layers. Duplicate base layer again. Image/Adjust/Curves, pull up curves as shown, or just use these ones . 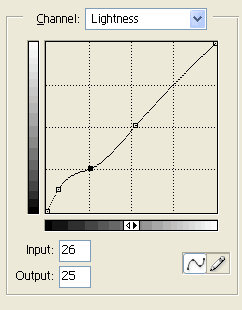 Layer blend Lighten, Opacity 15% | 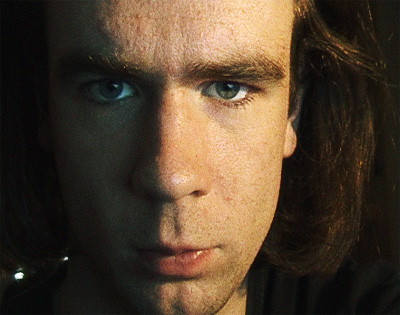 | |
| | ||
Highlight Pull-DownIn a similar manner, the highlight tones need a little softening to even out the image and avoid burn out. [Note: this step isn't shown in the layer palette at the end because I didn't really need it for this image. It is more effective on images with more extreme highlights.]Duplicate base layer again. Image/Adjust/Curves, pull doen curves as shown or use these. 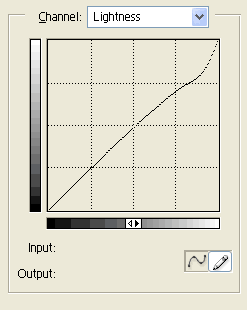 Image/Mode/RGB to convert back to RGB. Do not flatten layers. Layer blend Lighten, Opacity 20% |  | |
| | ||
Contrast Layer 2The above steps reduce the contrast slightly too much, so we restore this with another blended in grayscale layer to up the contrast but leave the colors relatively unchanged.Duplicate FILM Layer. Image/Adjust/Hue/Saturation Desaturate by 50% Layer blend Soft Light, Opacity 10% |  | |
| | ||
Illumination coloring layerAs a final coloring step, the light is colored by applying a gradient map to a grayscale version of the image. In this case, I've made the shadows slightly bluish and warmed up the highlights.Duplicate Contrast Layer 1 (the b&w layer) Select light yellow as foreground, dark blue as background Image/Adjust/Gradient Map apply gradient map. Tick the Reverse box. 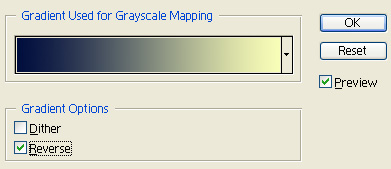
Layer blend Soft Light, opacity 20% |  | |
| | ||
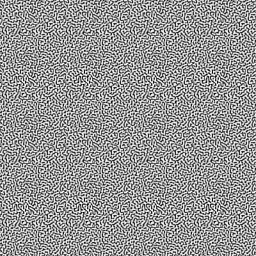
Grain LayerFinally, to give a nice texture, a realistic film grain pattern is blended into the image. This gives a nicer effect than pure noise.Fill, using this grain pattern as a pattern fill Layer blend Overlay, opacity 15% (adjust for more grain) | 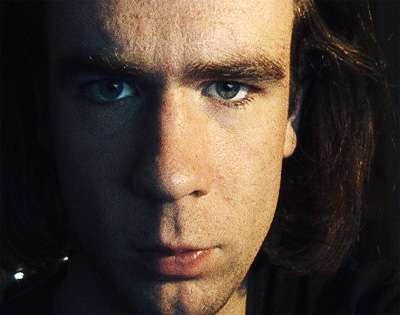 | |
| | ||
For black and white [optional]Flatten and mix via Channel Mixer. This gives much better results than desaturating. Be careful not to burn out the highlights and shadows | 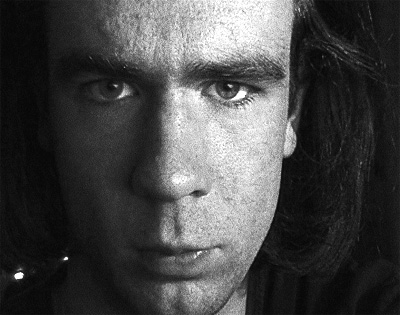 |
That's it! Adjust the various opacities to taste. You should have a layer palette that looks like this now:
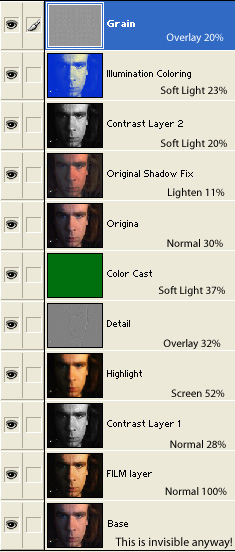
Since FILM layer is opaque, Base does not contribute to the image (it's just a backup copy of the unmodified image). You'll also have the highlight pull-down layer visible, which I don't have shown here.
Full-size examples
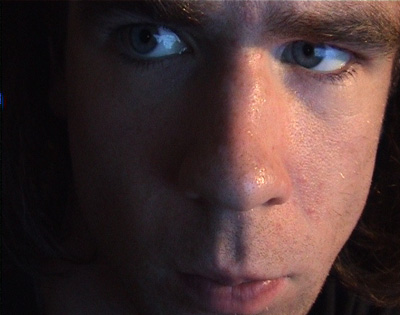
| Before | After | |||
|
|

|
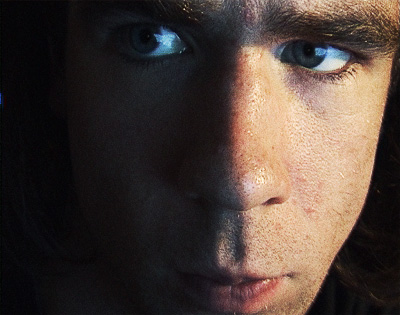
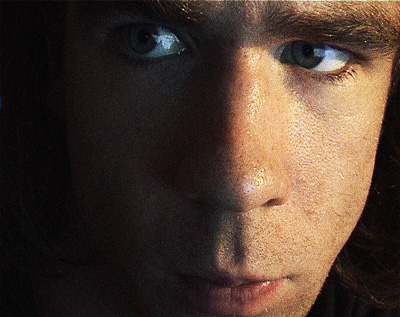
| Before | After | |||
|
|
|||
| Variation | Black and White | |||
|
|
Email me with comments.