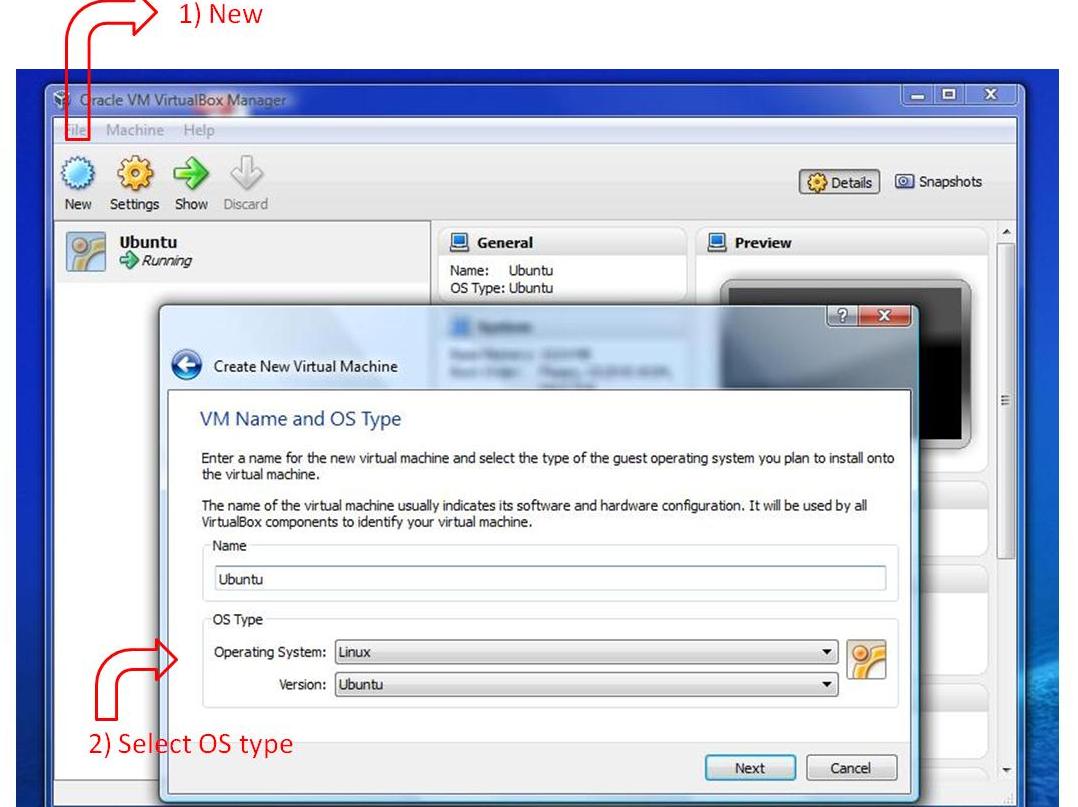
After installing and running the VirtualBox, you can create a new virtual machine(VM), as shown below:
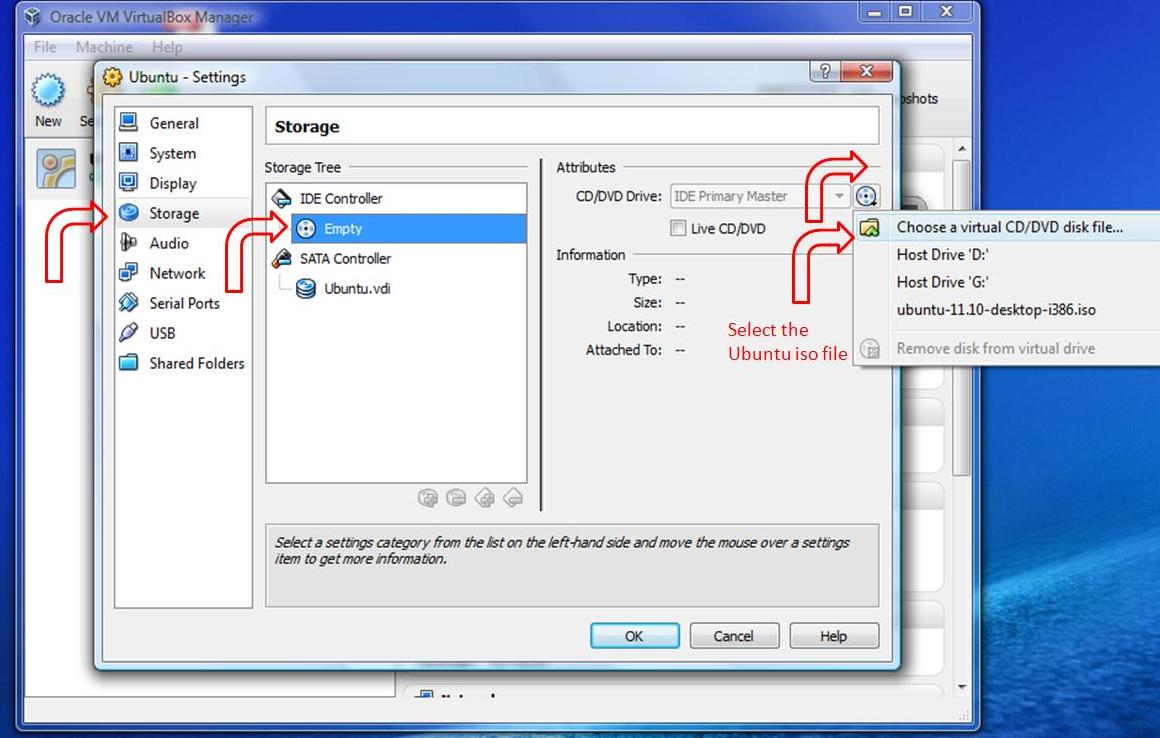
In the next step, you need to assign the Ubuntu ISO file (which you download before ) to the VM. Select  button, as shown below:
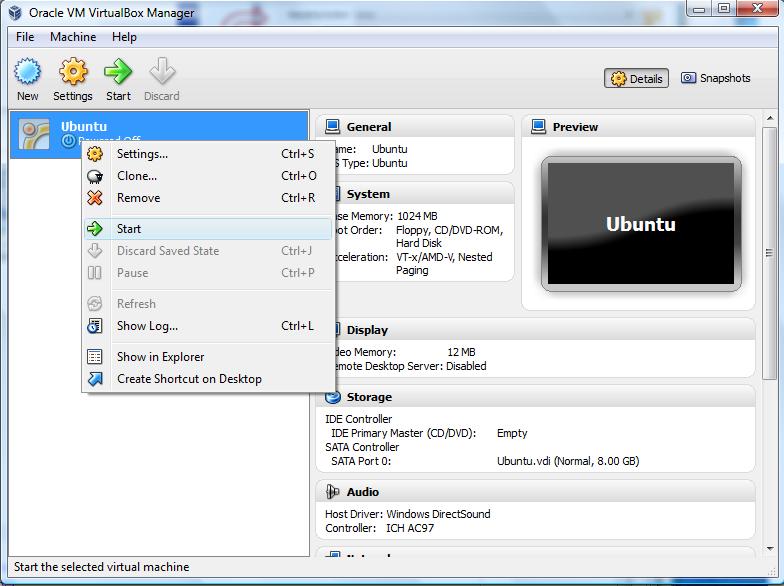
Now, the installation process can be started by click on the start button, as shown below:
Enjoy the Ubuntu OS inside your Windows :)
- APT protocol, or apturl, from a web browser: apturl works by default with Firefox. By clicking on a special link on a web page, the apturl protocol will launch the package manager to propose the installation of the package.
- Via a graphical method: Ubuntu Software Center is a simple graphical way of installing and removing applications
- Synaptic is a graphical front-end to apt-get command. Since Synaptic is no installed by default, it should be installed as shown follow:sudo apt-get install synaptic
- Text based methods that require familiarity with the terminal. The apt-get program is a command-line package manager, which is easy to operate and in some cases is quicker to use and more powerful than the graphical tools. sudo apt-get install <package_name >
- GDebi is a simple graphical tool to install .deb files. It automatically checks packages for their dependencies and will try to download them from the Ubuntu software repositories if possible. To install GDebi, open a Terminal and type: sudo apt-get install gdebi
- dpkg is a command-line tool used to install .deb files. To install a package with dpkg, open a Terminal and type the following: cd directory
sudo dpkg -i package_name.deb
echo $S
But in double quotation we have:
echo $S
If we use backslash before special character we will have:
echo $S
echo "Second argument is $2"
command1
command2
elif condition2 ; then
command3
command4
else
command5
command6
fi
echo "Number of parameters is one"
elif [ $# = 2 ]; then
echo "Number of parameters is two"
else
echo "Number of parameters is more than two"
fi
command1
command2
done
while [ $count -gt 0 ];do
echo $count
count=$(($count-1))
done
- grep 'word' filename : search in the given file and returns lines which contain the word.
- vertical bar (|) : connect the output of one command to the input of another command.
- r:read
- w:write
- x:execute
In this example:
- owner has rwx (7)
- group has r_x (5)
- other users have none (0)
Which references can be:
- u:user
- g:group
- o:others
- a:all
- + (adds)
- - (removes_
- = (exact)
- r:read
- w:write
- x:execute
- sudo apt-get install fop
- sudo apt-get install m4
- sudo apt-get install libncurses5-dev
- sudo apt-get install openjdk-6-jdk
- sudo apt-get install unixodbc-dev
- sudo apt-get install g++
- sudo apt-get install libssl-dev
- sudo apt-get install xsltproc
- sudo apt-get install perl
- sudo apt-get install libwxbase2.8
- sudo apt-get install libwxgtk2.8-dev
- sudo apt-get install libgtk2.0-dev
- sudo apt-get install libqt4-opengl-dev
After installing the prerequisite packages, run the following command from the terminal:
- Download Erlang/OTP: wget http://erlang.org/download/otp_src_R15B.tar.gz
- Unpack the downloaded file: gunzip -c otp_src_R15B.tar.gz | tar xf -ortar zxvf otp_src_R15B.tar.gz
- Move into the base directory:cd otp_src_R15B
- Set the environment variable (ERL_TOP) to find the absolute path of the installation: ERL_TOP="`pwd`"
- Set the Erlang/OTP system in the $PATH: PATH="$ERL_TOP/bin:$PATH"
- Set the LANG variable: LANG=C; export LANG
- Configure the build:
./configure
If you want to install Erlang in a specific path, you can use prefix as shown below:
./configure --prefix=~/erlang
- Build the Erlang/OTP package:make
- Install the Erlang/OTP package:sudo make install
- Run Erlang:erl
- Exit from Erlang shell:q().
-
wget http://downloads.basho.com/riak/riak-1.1.1/riak-1.1.1.tar.gz
-
tar zxvf riak-1.1.1.tar.gz
-
cd riak-1.1.1
-
make rel
-
cd rel/riak/bin
-
./riak start
-
To test the installed Riak:
./riak pingYou should get "PONG" as a response
-
wget http://www.stats.bris.ac.uk/R/src/base/R-3/R-3.0.1.tar.gz
-
tar -xf R-3.0.1.tar.gz
-
./configure --prefix=/home/ag275/R
-
make
-
make install

